Lettering Arrived

For some reason, it’s always exciting to see the lettering for a model. Now I know I’m in the home stretch, and I can’t wait to see it on.

For all my Canada Altantic models thus far, I’ve asked All-Out Graphics to create custom dry transfers for me. It’s a bit pricey on a per-sheet basis, and so, I always squeeze as many cars as I can out of a single sheet. So, while a single sheet including negative came out to $55 for gold, I fit four passenger cars worth of sets on that sheet, which brings it down to 11 per car, and that’s not that bad considering it’s custom.

I like dry transfers because there’s no messing with decal film. Loads of people complain that they don’t like the one-shot deal, but I’ve never found that to be a problem. To apply the transfers, I always lay them out and tape them down first. Once they’re taped in place, and I’m happy with the positioning, I rub them down for good. I find it’s important to cut them straight to avoid any optical illusions.

Sure, in my youth I had to pull some up (they come off easily with tape as long as you don’t burnish them down with the backing paper), but mostly I find this method of applying dry transfers works for me. There, now I’ve probably jinxed it.

I’ll post once the car is lettered.

Goodbye to Pembroke I

I am often asked if I have a layout, and I’m always cagey about it. Technically, you could say I have a layout. This is the layout I described back in Model Railroad Planning 1999 (at least I think it was 99). Most of the photos in that article were of a little diorama I created, though, and there are few photos published of the actual layout. Here is the long, sad story of my first model of Pembroke, which never got off the ground.

In about 1996, I proposed an article on planning for Proto87 in Model Railroad Planning. The editor didn’t see the angle at first, but after a few drafts, I convinced him. Then, I decided to move to England in the summer of 1997. So, I decided I would get as much as I could done before we went so I could take some photos that highlighted it.

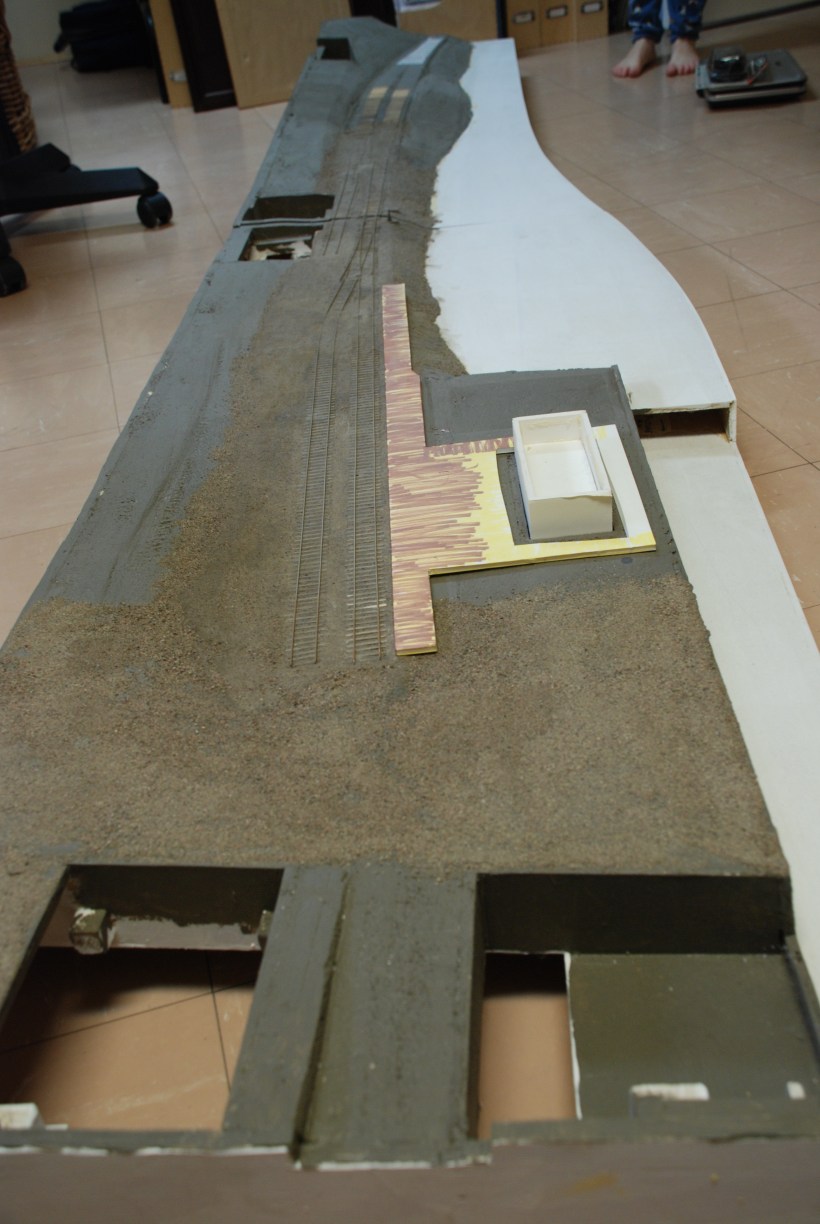
Through the spring, I worked feverishly on finishing some of the layout, any part of the layout, finally concentrating on the area around the crossover. Then I was ready to take pictures, but the weather wasn’t cooperative. I got some halogen flood lights because I didn’t want to plump for expensive photo floods, and attempted the photos with those. I also shot a role outside at dawn on one of the only nice days we got. Unfortunately I swapped the rolls of film (you remember rolls of film, right?) and wound up with one set that was totally yellow and another that was totally blue.

It was too late to shoot again, I was moving across the ocean in a matter of days, and the layout was already in storage under my friend Scott Calvert’s layout. So, I resolved to build a little diorama that would serve for the article once I got to England.

Pembroke looking south

So the layout sat under Scott’s layout for four years while we traveled around Europe and suffered in Henley on Thames. While we were there, some things happened. The first one was an encounter with Bruce Pappin, who had the first photos I’d actually seen of the townsite. Up until now I had been working from fire insurance plans, and some assumptions. Nothing like building a model to make a photo of the real thing show up, I always say.

In Bruce’s photos, you can clearly see that I got the level of the river completely wrong, and the gound around the station is not right either. Both of these are difficult to change, especially the river as it holds the fascia to the curve at which it is bent.

The second thing that happened is that one of the stock rails came loose. This shouldn’t have been such a big deal, but it was soldered to studs that were in turn soldered to PC board under the ballast. I can’t see how I can mend this without making a cold joint inside the ballast or lifting the ballast. That method of track laying was, it turns out, not especially good.

Frog detail

I could fix everything, but there comes a time when the list of things to fix is so long, it’s just easier to start over, and I think I’m there now. Certainly the fact that the layout sat for almost eight – count ’em – years partially set up in our current basement indicates that there is something seriously wrong.

So, I’m starting over. This is the year that we renovate the basement and make it a comfortable place for making trains and for the kids to play. Time will tell how these two activities mix.

Passenger Car

So here is the Turkish Rouge passenger car. Of course, the colour is impossible to get right, and with pretty much every monitor I see it on it is a different colour. It also shifts substantially depending on the artificial light. Overall, it was all a bit silly to go to such lengths to obtain the right colour based on a newspaper account. But here we are, the standard colour for my Canada Atlantic passenger coaches is now going to be NYC Pacemaker Red from Polly Scale.

I’m quite pleased with the way it has turned out thus far. Not much more to complete, except the lettering, of course!

The Search for Turkish Rouge

No sooner had I declared that the cosmetics industry couldn’t be counted on for historical accuracy, than I thought to myself that while that might be true of the industry itself, there are probably people out there who are interested in the historical accuracy of their cosmetics. After all, there is a slew of historical movies made every year, and I’m sure those makeup artists take their work very seriously. So, I set out to find such people.

It didn’t take long to come across the very friendly and helpful people on the EarlyPerfume Yahoo group. They not only knew what Turkish Rouge is, but how to make it (three different recipes!) and one of them even sold me a small packet of the key ingredient, Alkanet. Now, alkanet is the root of a plant, commonly known as Dyer’s Bugloss, and I’m pretty sure it hasn’t changed its root colour too much in the past 100 or so years.

So, all I had to do was to make some Turkish Rouge and then try to match it in paint. At the start, the root gave a very pretty pink colour, which I refuse to apply to any model I ever build. However, after a day, it’s now getting quite intensely red. By varying the depth of the container, I can get colours from the jolly pinky red shown here to a deep carmine and ultimately black.

There was an alarming shift from the orange side of red toward cerise when I brought it out of the halogen lights in the kitchen and into the daylight fluorescent down here in the train room. I see it has shifted again with the camera and my monitor. Meanwhile, the paint chips didn’t move nearly as much.

Oh what to do? And all this is because some reporter back in the late 19th Century chose “turkish rouge” to describe a new engine colour. We all know how reliable those chaps were. What if he was colour blind?

Woohoo! I’m on the Long Tail!

I’ve blogged elsewhere about the way that I see manufacturing changing from huge production to small runs. Obviously in a hobby like model trains, the ability to efficiently create a small run is even more important because there are so many things you could possibly make a model of and comparatively few modelers. Indeed, the economics for today’s short runs of injection-molded wonder-models are truly astonishing and probably only work because we offload pollution and worker safety to other countries. Enough said about that, because I believe that the future of the hobby lies with rapid prototyping anyway, and the passenger car that has been going on for almost two years is my first proof.

Today I got word from Shapeways that someone actually forked over the dough to buy my model. This is my first proof that the long tail of the hobby exists as I think it does.

I’m thrilled that someone else is going to join me in making this model. If you are that person, please contact me either through the comments or through email. I’d love to hear how your print comes out, and I’d love to see how your model progresses as you put it together. If you’re the type who blogs about it, let me know, and I’ll link over to you.

Passenger Car Colour

When I started researching the Canada Atlantic, and thinking I might one day model it, one of the supposed benefits was that a railroad that disappeared 85 years ago (this was about 1990) offered both freelancing and prototype modeling opportunities. Sadly, it turns out that I suck at freelancing.

I think it started with a corner of the mouth comment from Pete North, now of Kelowna or is it Penticton, when as a teenager I was assembling a couple of old Ulrich zamac semi trailers for my friend Tom Hood. When it came to a question of colour, he said something like I should really find a picture of a real truck of this type and copy it. Well that was pretty much the end of freelancing for me. I did paint those trucks whatever colour Tom wanted, but I was scarred for life.

Twenty years later, I am a committed prototype modeler, and an unapologetic rivet-counter (where did that term go anyway?). But now, the fact that there is so much unknown about the Canada Atlantic is not freedom, but a paralysis. Sometimes I go ahead and build something in the face of undiscovered information, only to have a picture crop up later to confirm or deny my suppositions. The best example of this is the original Pembroke layout, which was partially built in 1997 with the river much too high; a photo emerged just as I was starting to lay track proving I was wrong, and the layout has remained uncompleted ever since. The plan is to start over this year.

Sometimes, we period modelers just have to go with the best information we have. Take this passenger car I’ve been building, for example. Assuming that it is in fact a CA car (there is reason to doubt, but that’s another story), we know very little about its actual colour. There are two sources that I’m aware of — a reference to a locomotive (414) that was painted “Turkish Rouge” (Turkish Red!, Turkish Red!, Turkish Red 😮) to match its train, and this just in time photograph that I came across last year.

True there were no colour photographs in 1896-1900, and this is consequently a colorist’s interpretation of the black and white photograph, but this is the best information I’ve got. I’m definitely not going with any of those commercial makeup colours – that industry definitely can’t be trusted for historical accuracy, but these cars are in a nice railroady reddy wine colour, and so, that’s what I’m searching for. No, I haven’t found it yet. Today’s favorite swatch is a bit of Pacemaker Red, but it’s not purple enough. So, the search continues.

Incidentally, I’ve loosened up the comments section. You no longer have to log in to post a comment, but I have to moderate them. Maybe now I’ll have fewer requests to become users with really rude names; probably I’ll have to view some really questionable posts, however.

Well that was curious

I have spent literally days on trying to figure out why one end of the passenger car was so high. The bolsters were the same height relative to the floor and the platforms were not .5 mm different from the floor, but somehow the car was sitting with one end a half millimeter higher than the other. Finally, I switched trucks end for end, and the difference went away.

A few more minutes of puzzling revealed the culprit: the hole in one of the trucks was too tight. So, when I backed it out to allow a little equalization, it was actually lifting the whole car! A few twists of a broach and all was perfect. Still, a strange puzzle.

Roof Details

Despite how it might seem if you follow this blog, there is still modeling going on in my basement. Here are all the bits that belong on the roof. Everything is scratchbuilt because, well, I’d rather spend my time doing that than pouring through catalogues looking for parts that probably won’t fit properly anyway.

The five lamp jacks were created with pins soldered into tubes, and pieces of sheet soldered to the outside of the tube, then turned down to size in my drill. A similar process made the toilet vents (I considered using a nail, but I couldn’t find two that matched).

The Baker heater stacks are made from a piece of 1/8″ rod turned in the drill for the base, then soldered to the stack itself, with the cap bent from sheet and soldered on. It’s interesting to note that the Baker heater stacks are oriented with their hoods lengthwise to the train on my car, while I would have installed them cross-wise so air doesn’t blow down the flue and into the car.

Everything except the Baker heater expansion tanks comes off for painting so I can get some nice crisp colour separations between what will likely be subtly different shades of black.

pesky baker heater

I’m still not sure I’ve got the right shape for the Baker heater expansion tanks. They started out as Scupley shaped on the model, baked and sanded off the model, and then glued in place and further sanded. Then I looked at some other tanks and decided I needed to make it squarer, and so I corrected the shape with Squadron White putty. Then I went back and looked at the photos of my car, and I don’t think it should be quite so big. Sigh. I don’t think I’ll correct it.

The top up funnel and cock is a little jewel: three pieces of brass that could just about fit on the head of a pin. They turned out nicely, even if I say so myself.

Minimum Wall Thickness

I submitted my designs to Shapeways, and waited with baited breath for their realization in plastic. By the tenth day, I wanted to race home at lunch time to check the mail box. That day passed, as did the next and a few more; finally I got an email from Shapeways.

Apparently they do one last manual check before submitting the model to print, and in this manual check they found that I had violated the minimum wall thickness. Now, I knew I was violating this rule, but with a thorough read of their site, it seemed like I could do so as long as I kept the distances minimal. The way I read it, I should be able to have a short span of something finer than 1 mm diameter. However, this turns out to be false: you can have something that ends finer than 1 mm, like a knife edge, but you can’t have a barbell shape with a fine handle.

So much for window mullions, or printing ladders, at least for now. I’ve redesigned the passenger car without any window frames, and I guess I’ll get those laser cut in .015 material. The more challenging redesign was the truck, however. For this, I’ve made all the various straps in the double arch bar include a 0.7 mm (minimum wall thickness for white strong flexible) diameter rod that tapers to the front and to the back. It doesn’t look too much worse than the draft angle on some of the older injection molded arch bar trucks, at least on screen.

I’m going to wait a week before I submit the job so it doesn’t arrive when I’m on holidays. Hopefully this time, it passes muster and I actually get some plastic!

Water tight and ready to print!

Okay, it’s all cleaned up and uploaded to Shapeways. For only $100, I can get this printed, but I’m going to design a couple of small test pieces to try out as well. So, you’ll all have to wait a few more weeks for the print photos. Now that I’ve got the little dance with MeshLab and AccuTrans all figured out, getting a printable model is actually straightforward.

If there’s one thing I’ve learned in this drawing, it is that SketchUp! doesn’t like working in HO scale. It is much more comfortable in full size. One of the small pieces is a truck, and I’m designing that full size, so we’ll see how Accutrans does with the conversion to HO scale.